Tuesday, February 14, 2012

Savory Caramelized Onion "Quiche"

This awesome recipe comes from Diet, Dessert and Dogs. I suppose I never really considered having something so savory tasting for breakfast. I've always thought of cereal or oatmeal with something sugary and/or fruity thrown into the mix. But this onion quiche is kind of a game-changer!


You can store in the fridge for at least a few days, enabling you to simply wake up (as if waking up is really ever that simple, hehe) and heat a slice in the microwave for a quick breakfast/lunch/whatever. Either way, this caramelized onion "quiche" is pretty great stuff. I like to top it with some roasted garlic! 

Friday, February 10, 2012

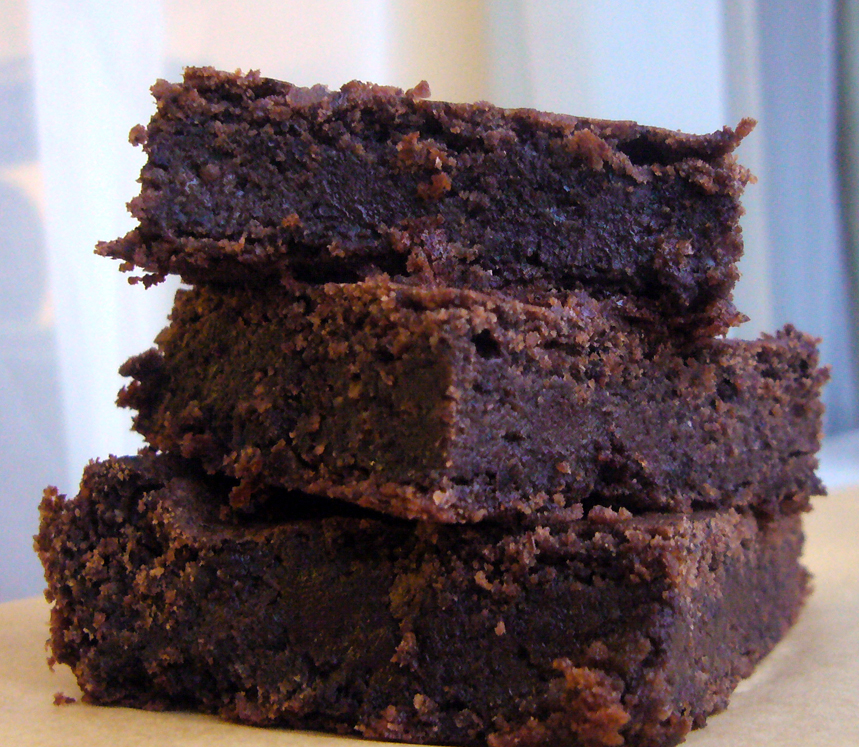
Black Bean Brownies

In the years that I've spent browsing recipes on the inter-webs I've always come across a recipe for brownies... made with black beans. The thought of beans in brownies always grossed me out, to be completely honest. But I'm here to tell you that adding beans to brownies is totally NOT gross! I promise. The beans add a moist fudgy-ness to the brownies and your tongue won't even be able to detect them!

I came across this recipe for black bean brownies which were made with 3 eggs. I just took out the eggs, and added in the equivalent of 3 flax "eggs".


  • 3/4 cup dried black beans, rinsed, and soaked overnight in water in the fridge, 
  • 3 flax "eggs" --> 3 Tbsp. flax meal + 8 Tbsp. warm water, mix and let sit for at least 15 minutes to "gel up"
  • 5 Tbsp. vegetable oil, I used a mixture of 3 Tbsp. canola + 2 Tbsp. coconut oil
  • 1 cup sugar/muscovado/sucanat
  • 1/2 cup cocoa powder
  • 1/4 cup GF oat flour
  • 1/2 cup almond meal
  • 1 tsp. vanilla extract
  • 1/2 tsp. baking powder
  • 3/4 cup vegan chocolate chips (I use EnjoyLife brand)
If using dried beans: drain soaked beans, place in large pot and cover with water. Bring to a boil, then reduce the heat and simmer for 1 hour until beans are tender. Drain. Let cool.

  1. Preheat oven to 350F/180C. Line a 11x7in. pan with parchment paper or grease with cooking oil.
  2. Add the cooled cooked beans to food processor and blend until a smooth paste has formed.
  3. Add the flax eggs and oil to processor, pulse to combine.
  4. Add sugar, cocoa, almond meal, vanilla, and baking powder. Process until well combined.
  5. Add chocolate chips or chopped chocolate and pulse until mixed. 
  6. Spoon the mixture into prepared pan. Bake for 50-60 minutes or until a toothpick comes out clean when inserted. I first baked mine in a 9x9in. pan and it took quite awhile for them to bake! Definitely took over an hour. If baking in an 11x7in. pan it might take less time to bake. Let cool before slicing!

Monday, December 5, 2011

Red Lentil Soup

This lentil soup is simple yet so tasty and comforting!


The apartment we're currently leasing here in Chicago has old-school radiator heating (which the landlord pays). This basically means that the radiators turn on about three times during the day/night, making it unbearably hot. The heat then quickly dissipates due to the apartment's poorly insulated windows and doors. We keep heated blankets and a sleeping bag (seriously!) on our couch to keep warm. Needless to say, I'm always decked out in multiple layers of clothing from head to toe (and yes, I really do mean head-to-toe, that includes wearing beanies indoors). In addition to snuggling in sleeping bags, we also eat generous amounts of hot soup to keep warm! 


Lemony Lentil Soup

  • 2 cups red lentils, picked over and rinsed
  • 8 cups vegetable broth (or water)
  • 2 bouillon cubes (Edward & Son makes a great vegan and GF bouillon) see link
  • 1 large onion, diced
  • juice of 1/2 - 1 lemon, a little under 1/4 cup I think
  • 1 tsp. coriander
  • 1/2 tsp. cumin
  • 1 tsp. black pepper
  • 6 cloves garlic, minced
  • 2-3 large carrots, chopped
  • 1 Tbsp. tamari or Bragg's
  1. Heat a large soup pot over medium heat and add 2 Tbsp. oil. Add the diced onion and sautee for about 5 minutes. 
  2. Now add the garlic and black pepper. Stir. Cook another 3 minutes. 
  3. Add the rinsed lentils to the pot, along with the carrots, tamari, veggie broth and bring to a boil. Reduce heat to a simmer and cover for 1/2 hour, stirring occasionally.
  4. When lentils are tender, add the dry spices and bouillon cubes (if using).
  5. Add lemon juice before serving. Add more salt/pepper to taste!

Saturday, November 26, 2011

Pumpkin Granola

Hopefully you aren't too pumpkin-ed out yet! The Holiday season is officially in full-swing, and I'm still lovin' me some pumpkin! Especially when it's incorporated into my favorite breakfast/snack food of all time. Yep. I'm talkin' about granola.


Pumpkin Granola

  • 5 cups GF rolled oats (not quick cooking kind)
  • 1/4 cup pumpkin seeds
  • 1/2 cup pumpkin puree
  • 1/4 cup applesauce
  • 2 Tbsp. coconut oil melted (or EarthBalance butter, or canola oil)
  • 1.5 tsp. vanilla extract
  • 1/4 cup maple syrup (or agave)
  • 1/4 cup brown sugar
  • 1.5 tsp. cinnamon
  • 1/4 tsp. nutmeg
  • 1/4 tsp. ground cloves
  • 3/4 tsp. salt
  • 1/2 cup sliced almonds


  1. Preheat oven to 325F.
  2. In a large bowl, mix the pumpkin, coconut oil, maple syrup, brown sugar, vanilla, and applesauce.
  3. In another bowl, mix together dry ingredients (except the almonds and pumpkin seeds) and spices. Add the dry ingredients to the wet ones in the large bowl.
  4. Stir, coating well. Spread mixture over two baking sheets lined with parchment paper. 
  5. Bake in preheated 325F oven for 20 minutes. Remove and stir. Add in the pumpkin seeds and sliced almonds. Place back in oven for another 20 minutes. If it doesn't seem crisp enough yet, don't worry. It will crisp up as it cools down!

Thursday, November 17, 2011

Raspberry Coconut Scones

I think it's safe to say that raspberries are one of my favorite fruits. Definitely my favorite berry. I made these scones a few months ago when I could still get my little hands on mountains of those perfectly ripe end-of-summer raspberries. I'm sure frozen ones would work out here, or even some blueberries, hella yum! Just thaw those berries first.
I had come across this recipe for the scones at Hope for Healing's blog. This recipe marks my first baked good attempt with coconut flour! These scones are probably one of the tastiest baked goods that I've made. They are a tad bit crumbly, so use a plate for those free-falling crumbles. 
I found that storing them in the fridge is the best way to go, considering they do contain coconut oil, the fridge helps to keep that oil solid in the scones.
I also love the fact that there is no xanthan gum in them!


I made a few modifications to the original recipe: because I didn't have millet flour on hand, I subbed 1/3 cup sorghum flour and 1/3 cup brown rice flour for the millet flour. That's it! 


I'm not going to re-type the recipe here, so check it out at: Hope for Healing 


Wednesday, November 16, 2011

Karyn Calabrese video - vegan, raw

Although I do live in Chicago, I have yet to visit one of Karyn's restaurants. I will hopefully be visiting one in the next few months! I've been feeling under the weather these past few weeks, so I apologize for not posting any recipes! I do have a great video to share with you all, though. It's an interview with Karyn Calabrese. Check it out! Maybe you'll learn something new!


Although I do not follow a raw food diet, I definitely agree with Karyn! 

Monday, October 31, 2011

Roasted Garlic

A few years back, when I was still eating crusty gluten-filled french baguettes, I came upon a how-to for roasted garlic bulbs. I distinctly remember the night when I had my first taste of roasted garlic. It was magical. I had my crusty baguette all ready to go. i seriously just stood at the counter spreading the creamy garlic cloves like butter on my baguette. No time for sitting, this was a life-changing experience, people. Of course when consuming large amounts of garlic, it is totally crucial to have anyone else you may be living with to indulge in the garlic-y goodness as well. This is so you both become immune to garlic-y... umm... body aromas ; ) Enjoy.
Cut the top parts of garlic bulb off, (the pointed end)
exposing the inner cloves.
Side view.
Rub olive oil over top of bulb.
  1. Preheat oven to 400F.
  2. Peel away the outer layers of bulb - the husk-like papery stuff. Cut the top pointy end part of bulb off, about 1/4 inch. 
  3. Place each garlic bulb in a piece of aluminum foil. Rub some olive oil onto the top part of each bulb. I don't measure, but maybe 1 Tbsp?
  4. Wrap the bulb up in foil.
  5. Bake at 400 for 30-35 minutes, until the cloves are soft.
Served with some roasted delicata squash rings!