Showing posts with label gluten free. Show all posts

Sunday, August 19, 2012

Spiced Teff Bars


Summer is my favorite time of year. No doubt about that. But lately, the cooler temps we’ve been experiencing have my mind drifting towards cinnamon spiced treats. Nothing says autumn like cinnamon!   


Now, these tasty treats are made with teff. Don’t worry if you’ve never heard of it. Many people are unfamiliar with this grain. Teff has a long history and has been used for ages in North Africa. More specifically; teff is used in Ethiopian cuisine to make injera, which is an Ethiopian spongy flatbread that tastes a bit like sourdough.  Fun fact: teff is one of the smallest grains in the WORLD! 

Health benefits of teff:
  • high in fiber
  • good source of protein
  • great source of iron
  • good source of calcium
Teff has a very distinct and almost earthy taste to it that goes well with the spices and molasses in these bars. These guys seriously taste out-of-this-frickin-world with a cup of coffee! 

Spiced Teff Bars
the original recipe is over at Whole Life Nutrition Kitchen
I only made a few tiny changes though (added some more spices)!

2/3 cup of softened coconut oil
1/3 cup unsweetened applesauce
1/3 cup blackstrap molasses
1/2 cup Sucanat
1 Tbsp. maple syrup or agave
1 Tbsp. vanilla extract
2 cups dark teff flour
1/2 cup tapioca flour
1 teaspoon baking soda
1 teaspoon guar gum (or xanthan gum)
1/2 teaspoon sea salt
1 tablespoon cinnamon
1 to 2 teaspoons ground ginger (I didn't have any, so just used some minced/pureed ginger)
1/4 teaspoon ground cloves
1/4 teaspoon ground cardamom
1/8 teaspoon nutmeg or allspice
  1. Preheat oven to 350 degrees F. Oil a 9x9 square pan or line with parchment paper.
  2. In large bowl, use an electric mixer to mix the coconut oil, applesauce, molasses, sugar, maple syrup and vanilla until combined.
  3. In another bowl, mix together the dry ingredients and spices. Add the dry ingredients to the wet and beat again until dough thickens. 
  4. Spread the dough into prepared baking pan.
  5. Bake for about 25 minutes in preheated oven at 350. Let the bars cool for at least 30 minutes before trying to cut. Serving suggestion: drizzle some coconut butter on top!
Note: I've found that these need to be stored in the fridge because they tend to crumble if left out at room temp. 


Friday, July 20, 2012

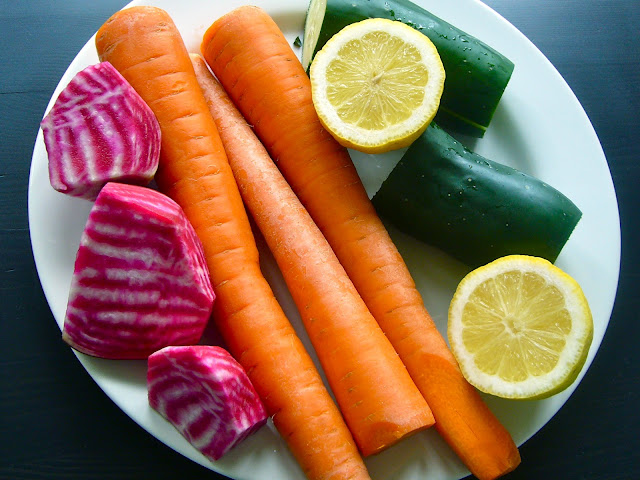
Sunrise Energize - juice


To be honest, the end result of juicing isn’t all that photogenic (at least when you're adding carrots to the greens). Mixing neon orange carrot juice to electric green gives way to an unappetizing muddy-brown color. But I can assure you that the juice tastes much better than it looks!

So … here’s a tasty juice I made the other day.  Usually when I first wake up I don’t want a juice that’s heavy on the greens. I save those juices for later in the day. This juice is definitely a sweet one! Here is a nutritional breakdown of the juice (with the exception of the fiber part): Holy vitamin A!!!!

Sunrise Energize

  • 1/2 beet (I used chioggia, any kind will work)
  • 1 cucumber, peeled if not organic
  • 1 lemon, peeled
  • 3 carrots
Wash all fruits and veggies. Cut to fit size of your juicer's chute. Juice. Add a few ice cubes and enjoy!


Sunday, July 15, 2012

BBQ Chickpea Burgers


I always have trouble finding the perfect vegan (and gluten free) veggie burger recipe.  I know many of you out there have the same problem.

Vegan veggie burger recipes are notorious for making patties that don’t stick together well.  When I saw this recipe (@OhSheGlows) for burgers with a chickpea base I was curious as to how they would hold up.  For as many times as I’ve made falafel (and for the record, I LOVE to eat falafel), it has never occurred to me that making a veggie burger with a base of chickpeas (and rice) just might work.  The verdict: it does!

Because it has been so hot lately, I’m totally a fan of any recipe that allows me to make a big ol’ batch of somethin’ that can be stored in the fridge for a few days.  I tend to snack a lot throughout the day so it’s always nice to have something with a decent amount of protein and fiber to grab instead of tortilla chips or some other nutritionally flimsy snack. 

I only used half a jalapeno because I’m not too fond of spicy things, but did want a little bit of the flavor that jalapenos contribute.  I also substituted grated zucchini for the red bell pepper.  I like to eat these pretty simply; wrapping them up in a huge romaine lettuce leaf, perhaps with a small dab of BBQ sauce, hummus, or just as is. 

  • 1 cup dry/uncooked chickpeas (or 2 & 1/4 cups cooked chickpeas)
  • 1/2 cup dry brown rice (or 1 & 1/4 cup cooked rice)
  • 3 tbsp sunflower seeds
  • 2 large garlic cloves, minced
  • 1/2 cup grated zucchini
  • ½ - 1 jalapeno, seeded and diced
  • 1/4 cup yellow onion, diced
  • 1 small carrot, grated
  • 1/4 cup minced fresh parsley
  • 2 tbsp BBQ sauce
  • 1/2 cup GF breadcrumbs
  • 2 tbsp ground flax
  • Fine grain sea salt, to taste (I used 1 tsp)
For dry chickpeas: Soak overnight (or at least 12 hours) in a large bowl filled with water. The next day, drain and rinse chickpeas well. Place chickpeas in medium-sized pot with plenty of water (I don't really measure). Bring water to a boil, lower heat, then cover and allow to simmer for about 1 hour. At this point, chickpeas should be tender and you can let some cool down and test them out. Drain and rinse. Allow to cool (at least 15 minutes) before using.

Cook that rice: Bring 1 cup of filtered water to a boil in medium saucepan. Add 1/2 cup dry brown rice. I also add about 1/4 of a veggie bouillon cube. Reduce heat to low. Cover. Simmer on low for about 30 minutes, or until most of the water is absorbed. Turn off heat and let sit (covered) for 10 minutes. 
  1. Chop/grate vegetables. Place all veggies together in large bowl and add half the salt (or about 1/2 tsp.).
  2. If using canned chickpeas, drain and rinse now.
  3. Add parsley to food processor and chop until fine. Add chickpeas and cooked rice to food processor and pulse until coarsely ground (be careful not to process too much, it will be too mushy and leave you with sloppy patties)!
  4. Add the parsley, chickpeas, and rice mixture to the bowl with veggies. Mix well. 
  5. Now, stir in the sunflower seeds, BBQ sauce, breadcrumbs, and flax meal. Add the other 1/2 tsp. of salt, or to taste. 
  6. Preheat non-stick skillet over med-high heat. 
  7. Form patties and cook on skillet about 5 minutes for each side, or until browned. I forget exactly how many this recipe made, but it was at least 8. I like mine on the thinner side, however. 


Friday, April 20, 2012

Karyn's Cooked restaurant - in Chicago

Karyn's cooked has been on my restaurants to visit wish-list for quite some time. The boyfriend and I dined here a few weeks ago. Here are my thoughts on our visit…


I ordered the carrot-tofu Flautas, which were $13. The flautas were a little too greasy for my liking, though the description does state that they are fried so I suppose I was warned. The carrot-tofu filling tasted a little soapy(?) and could have used a great deal more tofu. If I’m paying $13 bucks for a dish, it better have a substantial amount of protein, ya dig? I’m guessing the flautas barely had a serving’s worth of tofu in them.  But the flautas did come with a decent side of refried black beans, some tortilla chips, as well as a huge scoop of guacamole and some mixed greens with salsa.

I wasn’t impressed with what the boyfriend got (Southern Comfort entrĂ©e). I’m not that fond of collards in the first place, but these didn’t taste that fresh to me and looked like maybe they were prepared from frozen greens? The dish did come with a HUGE portion of beans, though, with rice and cornbread on the side (not gluten-free, by the way).

I really liked the carrot ginger soup. Not too gingery, and it had the perfect consistency.  They also serve Mighty Leaf tea, so that’s pretty rockin'. Overall, I would probably give Karyn’s another shot, as I was not that impressed with our first visit. It wasn’t BAD, but it wasn’t GREAT


Friday, February 10, 2012

Black Bean Brownies

In the years that I've spent browsing recipes on the inter-webs I've always come across a recipe for brownies... made with black beans. The thought of beans in brownies always grossed me out, to be completely honest. But I'm here to tell you that adding beans to brownies is totally NOT gross! I promise. The beans add a moist fudgy-ness to the brownies and your tongue won't even be able to detect them!

I came across this recipe for black bean brownies which were made with 3 eggs. I just took out the eggs, and added in the equivalent of 3 flax "eggs".


  • 3/4 cup dried black beans, rinsed, and soaked overnight in water in the fridge, 
  • 3 flax "eggs" --> 3 Tbsp. flax meal + 8 Tbsp. warm water, mix and let sit for at least 15 minutes to "gel up"
  • 5 Tbsp. vegetable oil, I used a mixture of 3 Tbsp. canola + 2 Tbsp. coconut oil
  • 1 cup sugar/muscovado/sucanat
  • 1/2 cup cocoa powder
  • 1/4 cup GF oat flour
  • 1/2 cup almond meal
  • 1 tsp. vanilla extract
  • 1/2 tsp. baking powder
  • 3/4 cup vegan chocolate chips (I use EnjoyLife brand)
If using dried beans: drain soaked beans, place in large pot and cover with water. Bring to a boil, then reduce the heat and simmer for 1 hour until beans are tender. Drain. Let cool.

  1. Preheat oven to 350F/180C. Line a 11x7in. pan with parchment paper or grease with cooking oil.
  2. Add the cooled cooked beans to food processor and blend until a smooth paste has formed.
  3. Add the flax eggs and oil to processor, pulse to combine.
  4. Add sugar, cocoa, almond meal, vanilla, and baking powder. Process until well combined.
  5. Add chocolate chips or chopped chocolate and pulse until mixed. 
  6. Spoon the mixture into prepared pan. Bake for 50-60 minutes or until a toothpick comes out clean when inserted. I first baked mine in a 9x9in. pan and it took quite awhile for them to bake! Definitely took over an hour. If baking in an 11x7in. pan it might take less time to bake. Let cool before slicing!

Saturday, November 26, 2011

Pumpkin Granola

Hopefully you aren't too pumpkin-ed out yet! The Holiday season is officially in full-swing, and I'm still lovin' me some pumpkin! Especially when it's incorporated into my favorite breakfast/snack food of all time. Yep. I'm talkin' about granola.


Pumpkin Granola

  • 5 cups GF rolled oats (not quick cooking kind)
  • 1/4 cup pumpkin seeds
  • 1/2 cup pumpkin puree
  • 1/4 cup applesauce
  • 2 Tbsp. coconut oil melted (or EarthBalance butter, or canola oil)
  • 1.5 tsp. vanilla extract
  • 1/4 cup maple syrup (or agave)
  • 1/4 cup brown sugar
  • 1.5 tsp. cinnamon
  • 1/4 tsp. nutmeg
  • 1/4 tsp. ground cloves
  • 3/4 tsp. salt
  • 1/2 cup sliced almonds


  1. Preheat oven to 325F.
  2. In a large bowl, mix the pumpkin, coconut oil, maple syrup, brown sugar, vanilla, and applesauce.
  3. In another bowl, mix together dry ingredients (except the almonds and pumpkin seeds) and spices. Add the dry ingredients to the wet ones in the large bowl.
  4. Stir, coating well. Spread mixture over two baking sheets lined with parchment paper. 
  5. Bake in preheated 325F oven for 20 minutes. Remove and stir. Add in the pumpkin seeds and sliced almonds. Place back in oven for another 20 minutes. If it doesn't seem crisp enough yet, don't worry. It will crisp up as it cools down!

Thursday, November 17, 2011

Raspberry Coconut Scones

I think it's safe to say that raspberries are one of my favorite fruits. Definitely my favorite berry. I made these scones a few months ago when I could still get my little hands on mountains of those perfectly ripe end-of-summer raspberries. I'm sure frozen ones would work out here, or even some blueberries, hella yum! Just thaw those berries first.
I had come across this recipe for the scones at Hope for Healing's blog. This recipe marks my first baked good attempt with coconut flour! These scones are probably one of the tastiest baked goods that I've made. They are a tad bit crumbly, so use a plate for those free-falling crumbles. 
I found that storing them in the fridge is the best way to go, considering they do contain coconut oil, the fridge helps to keep that oil solid in the scones.
I also love the fact that there is no xanthan gum in them!


I made a few modifications to the original recipe: because I didn't have millet flour on hand, I subbed 1/3 cup sorghum flour and 1/3 cup brown rice flour for the millet flour. That's it! 


I'm not going to re-type the recipe here, so check it out at: Hope for Healing 


Monday, October 31, 2011

Roasted Garlic

A few years back, when I was still eating crusty gluten-filled french baguettes, I came upon a how-to for roasted garlic bulbs. I distinctly remember the night when I had my first taste of roasted garlic. It was magical. I had my crusty baguette all ready to go. i seriously just stood at the counter spreading the creamy garlic cloves like butter on my baguette. No time for sitting, this was a life-changing experience, people. Of course when consuming large amounts of garlic, it is totally crucial to have anyone else you may be living with to indulge in the garlic-y goodness as well. This is so you both become immune to garlic-y... umm... body aromas ; ) Enjoy.
Cut the top parts of garlic bulb off, (the pointed end)
exposing the inner cloves.
Side view.
Rub olive oil over top of bulb.
  1. Preheat oven to 400F.
  2. Peel away the outer layers of bulb - the husk-like papery stuff. Cut the top pointy end part of bulb off, about 1/4 inch. 
  3. Place each garlic bulb in a piece of aluminum foil. Rub some olive oil onto the top part of each bulb. I don't measure, but maybe 1 Tbsp?
  4. Wrap the bulb up in foil.
  5. Bake at 400 for 30-35 minutes, until the cloves are soft.
Served with some roasted delicata squash rings!


Sunday, October 30, 2011

Easy Kale Chips

Salty. Crunchy. Extremely versatile and oh so easy to tailor to your specific seasoning needs. Kale is seriously one of the healthiest foods. Ever. In the world. 
It is full of vitamin K - which is important for proper blood clotting and healthy blood vessels, and vitamins A and C. 

After washing the kale, remove the large stem in the middle of each leaf as well as the vein-like tiny "stems" that run throughout the leaf. If you don't remove them they get ridiculously hard after cooking and will taste (and feel) like sticks, thus ruining the otherwise awesome and otherworldly experience that is kale chips ; )

Dry the kale very well. I ran mine through a salad spinner. Or blot super well with paper towel. Put kale into large bowl. Add olive oil and salt. Mix well. 

Other seasoning ideas:
- vinegar and sea salt (add 1 tsp. apple cider vinegar)
- chili powder and cumin
- garlic powder

Arrange kale on baking sheets, I had to use 3 total, lined with parchment paper. Bake at 300F for 20 minutes.

Saturday, October 29, 2011

Chewy Nutty Almond cookies

In a previous post I mentioned that I had tried a cookie recipe from the Gluten Free Goddess. These cookies ended up tasting just like caramel! I had to freeze half the batch just to ensure that I wouldn't end up eating them all at once! This tactic didn't really work out because I ended up thawing out the cookies shortly after freezing them... at least I made a legitimate effort, right?
I made some modifications to the GFG recipe - using Honeyville's blanched almond flour instead of Bob's Red Mill. Sometimes I find the taste of sorghum flour a bit too strong so I used a mixture of sorghum flour AND brown rice flour, subbed canola oil for the olive oil, and used a flax "egg".


Mix dry ingredients together in large bowl:
  • 1 cup Honeyville blanched almond flour
  • 1/2 cup sorghum flour
  • 1/2 cup brown rice flour
  • 1/2 cup tapioca starch
  • 1.5 tsp. baking soda
  • 1 tsp. sea salt (NOT kosher salt)
  • 1.5 tsp. xanthan gum
Mix/"cream" these together in another bowl:
  • 1 cup brown sugar (packed)
  • 1/2 cup sucanat
  • 1/3 cup canola oil (or light olive oil)
  • 1 Tbsp. vanilla extract
  • 1 Tbsp. agave nectar (or honey, maple syrup, etc.)
  • 2 Tbsp. flax meal mixed with 6 Tbsp. water

  1. Make flax "egg" and allow to sit for about 10 minutes, or until it starts to get gel-like. Then mix with other liquid ingredients. 
  2. Add the dry ingredients mixture to the creamed sugar mix.
  3. If too dry, add 1-2 Tbsp. almond milk, 1 Tbsp. at a time.
  4. Stir until mix has a dough-like consistency.
  5. Stir in, by hand, 1/2 cup chopped almonds (or pecans, hazelnuts, other favorite nut)
  6. Cover bowl and chill the dough for 30 minutes in fridge.
  7. Preheat oven to 350 degrees F (177 Celsius) and prepare baking sheet. Line sheet with parchment paper.
  8. Scoop little balls of dough onto lined baking sheet, 2 inches apart, and press dough balls down just a bit to flatten.
  9. Bake in preheated oven for about 18-19 minutes, until cookies are golden. I ended up slightly burning my first batch, and ended up being WAY TOO hard to eat after they cooled. Learn from my mistake ; )
  10. Remove cookies with spatula, place on cooling rack. 

Wednesday, October 26, 2011

Quinoa Bean Tostadas

These tostadas were inspired by the Chicago Diner's avocado quinoa tostadas. I quickly became addicted to these after moving to Chicago. For my version I just used store-bought corn tostadas and topped with a parsley-based Chimichurri sauce. You can purchase chimichurri in the store or attempt your own homeade.

I'm a fan of Frontera's Tomatillo salsa!
  • 1 cup quinoa, uncooked
  • 2 cups water or broth
  • 1 can refried black beans
  • toastadas
  • chimichurri sauce or tomatillo salsa
  • Roma tomatoes, diced
  1. Rinse quinoa until water runs clear. Drain in fine mesh sieve. 
  2. Bring 2 cups water or broth to a boil with quinoa in medium saucepan. Reduce heat to low, cover, and simmer for about 15 minutes until all water is absorbed. Set aside.
  3. Pre-heat oven to 375 degrees F.
  4. Assemble your tostadas by placing a layer of refried beans on top of the tostadas, followed by the quinoa. Place on cooking tray and placed in oven for 10-15 minutes, or until beans are heated through. 
  5. Top with chimichurri, avocado and diced tomatoes. 

Sunday, October 23, 2011

English Muffins - GF and Yeast-Free!

I've constantly been on the lookout for breakfast-type bread recipes that are gluten-free AND yeast-free. I recently came across this english muffin recipe from The Daily Dietribe. I just bought a bag of blanched almond flour from Honeyville and have been waiting for the right recipe to come along to try it out! The downside of almond flour is that it is very expensive. However, I don't really bake all that often (aside from VeganMoFo, that is) so when I actually do bake I don't mind using a more expensive flour if it means that I will get reliable and fantastic results!

And so far... everything that I have created in the kitchen with almond flour has turned out great! In addition to these english muffins, I've made some almond cookies from Gluten Free Goddess that tasted just like caramel! I will be posting about those in the next few days, so stay tuned!


Now, a word about these muffins. I realize that they don't really look like english muffins at all. I don't have any photos of the muffins that I've cut in half and toasted, but they work just like an english muffin with all the nooks and crannies! I swear!


GF English Muffins 
    check out the recipe from The Daily Dietribe

Bob's Red Mill - Mighty Tasty
Hot Cereal. An ingredient for this recipe!

Saturday, October 22, 2011

Snack - English Muffin with PB, hemp seeds

I recently bought a bag of Nutiva's hemp seeds. I've used hemp protein powder before in my smoothies and I've found that I'm not a big fan of it. But... the seeds themselves are pretty darn tasty and hemp seeds actually contain all essential amino acids, making it a complete plant protein! In case you were unaware, essential amino acids are those which the body cannot make and therefore must obtain from food sources (like hemp seeds, and flax, too!). If you'd like to know more about hemp seeds, check out the Body Ecology website.


Lately I've been getting bored with my usual granola breakfast, so I've been switching it up with some delicious gluten-free english muffins (made with almond meal, and are yeast-free) topped with either peanut or almond butter and a sprinklin' of hemp seeds. Great stuff! 

Wednesday, October 19, 2011

Flying Apron's Ginger Wheel cookies - VeganMoFo #11

Another awesome gluten-free recipe from the Flying Apron baking book. The recipes in the book make such large quantities, so I cut this recipe in half. Still made a ton of cookies!


Tuesday, October 18, 2011

Peanut Lime Tofu Salad - Vegan MoFo #10

I've really been enjoying romaine lettuce lately. It's a great source of vitamins A and K, so that's what's up on the nutrition front, yo. Pretty exciting, isn't it? 
  • 1 pkg. extra-firm tofu, prepared your favorite way, I marinate mine overnight in peanut marinade then sautee
  • 1 carrot, shredded
  • 1/2 cucumber, chopped
  • red bell pepper, sliced
  • 2 scallions/green onions, diced
Dressing
  • 1/4-1/2 cup peanut butter
  • 4 Tbsp. fresh lime juice
  • 1 clove garlic, minced
  • 2 Tbsp. Tamari
  • 1 tsp. sesame oil
  • 1 Tbsp. brown sugar
  • 1/2 - 1 cup vegetable broth (or water)
Combine all dressing ingredients in small saucepan and heat on low until peanut butter is melted. Mix well. Let cool. 
Toss dressing with the salad just prior to serving. Yum! Garnish with chopped peanuts and lime wedge!


Saturday, October 15, 2011

African Sweet Potato Stew

This is one of my favorite stews to make! That's because it has my favorite ingredient in it --> peanut butter!!! I do love sweet potatoes quite a bit, to be fair. 
I first found this recipe in the Vegan Planet cookbook by Robin Robertson. I've just tweaked it a bit, adding more cinnamon and broth, specifically. I've seriously made this recipe soooo many times that the binding on my book is coming unglued... right at this recipe's page.
Serve this stew with some brown rice or quinoa for added fiber-y goodness. 

Ingredients

  • 1 large yellow onion, chopped
  • 2 large sweet potatoes, peeled and chopped into cubes
  • 1 red bell pepper, chopped
  • 2 Tbsp. olive oil or canola oil
  • 1 garlic clove, minced (1 tsp.)
  • 1 tsp. ginger (I use pureed from jar if I don't have fresh ginger root on hand)
  • 1 can kidney beans, rinsed and drained
  • 1 can chickpeas, rinse and drained
  • 1 14-oz. can organic diced tomatoes, do NOT DRAIN
  • 1 tsp. salt
  • 2 Tbsp. brown sugar
  • 2.5-3 cups vegetable broth or water
  • 1/4 tsp. cayenne
  • 1/4 tsp. black pepper 
  • 3/4 tsp. cinnamon
  • 1/2 tsp. ground cumin
  • 1/2 cup chunky peanut butter
  • crushed peanuts for garnish and lime wedge (optional)


Directions
  1. Heat oil in large saucepan over medium heat. Add onion, cover, and cook until softened, ~5 minutes . 
  2. Add bell pepper, cover, cook another 5 minutes.
  3. Add the garlic, cook another few minutes. Add the spices, ginger, and brown sugar, stirring constantly until mixed.
  4. Add sweet potatoes and stir.
  5. Stir in canned tomatoes, veggie stock, and salt to taste. Bring to a boil. Reduce heat to low and simmer covered until vegetables are cooked, about 30 minutes. 
  6. Add the beans and peanut butter, stir until PB is melted and mixed into stew.
  7. Garnish with chopped peanuts and lime, optional. Serve!

Monday, October 10, 2011

Roasted Squash Seeds


One of my favorite things about cooking squash is the tasty little bonus of roasted seeds! Rich in iron, protein, magnesium, and copper, these seeds really hit the spot when you're looking for a savory and salty yet healthy snack. 

After removing the seeds and stringy-ness from the inside of the squash, place the seeds in a bowl filled with water. 
Pre-heat oven to 350 degrees F. Remove the strings from the seeds and rinse. 
Bring about 4 cups of water to a boil in a medium saucepan with 2 tsp. salt.
Boil the squash seeds for 10 minutes. Drain. 
In a small bowl put 1-2 Tbsp. olive oil (or canola) along with some garlic powder and salt (3/4 tsp.), or to taste. Toss the seeds in oil mixture. Place seeds in a single layer on baking sheet lined with parchment paper. Bake for 13-15 minutes. 


Friday, October 7, 2011

Biscuits (GF,V, and yeast-free!)

How many of you have problems digesting yeast? I never seemed to until recently. Needless to say, I didn't think that I was going to be able to enjoy most breads ever again. I couldn't accept that fate. What kind of life would I be living? But... I came across a recipe that used Bob's Red Mill AP GF flour mix, which I don't usually have on hand. I did, however, have Pamela's GF Bread Mix (which is vegan, unlike her baking and pancake mix which has buttermilk powder in it, if I remember correctly).

So, I figured I could sub in Pamela's mix for Bobs Red Mill. And you know what... it worked! These lil biscuits were seriously so good I ate the majority of them within 24 hours of making them! No joke. These are perfect. And oh so good smothered with jam!
  • 2 cups Pamela's GF Bread Mix
  • 1 Tbsp. baking powder
  • 1/3 cup vegan butter (Earth balance)
  • 3/4 cup almond milk, rice milk, other nondairy milk
    • FYI: Pamela's mix already has xanthan gum and salt mixed in! Score!

Directions
  1. Preheat oven to 450F. Line a baking sheet (or 2) with parchment paper. 
  2. In large bowl, combine all dry ingredients. Cut the vegan butter into the dry mixture until crumbly. I just used a fork. If you are super fancy and having a pastry cutter use that right here!
  3. In the middle of the bowl pour in the milk. Stir to combine.
  4. Flour a work surface. Turn the dough onto floured surface and knead a few times. Pat the dough down until about 1/2" in thickness. 
  5. Using a small glass, cut circles out of the dough. Place dough on parchment paper.
  6. Bake 11 minutes, or until light golden brown in color.